25 November 2016

The Quirks of Supporting SDK 25

The last developer preview of Android 7.1 has started shipping, which means APIs are (based on past experience) more or less stable. There is a very good write up on developer.android.com on how to get started with supporting these new features. I set about trying it out, and here's what happened.

Update SDK version

Let's start with the (supposedly) easy bit -- updating target SDK to 25. It should be as easy as updating your build.gradle file, but just like when the API 24 sources became available, I found that I have to edit the SDK path before Studio starts to recognise the new APIs.

Go to Preferences > Appearance and Behavior > System Settings > Android SDK, click Edit beside Android SDK Location and just keep on clicking Next until you exit the wizard.


Circular Launcher Icons

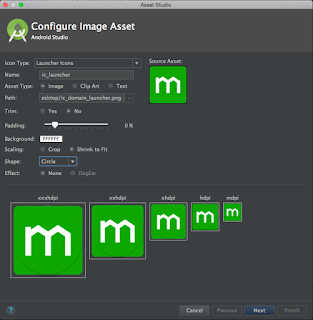
The next (supposedly) easier bit is having a circular launcher icon. First stop is to generate the new icon. Android Studio has a built-in icon generator, in fact the documentation encourages you to use just that. So launch Asset Studio (CMD+SHIT+A then Asset Studio, or, right click in Project Pane > New > Image Asset).

Choose Image as the Asset Type, then click the three dots to choose your existing icon. Now I know that pointing it to the current icon in mipmap/ or drawable/ should work but it didn' t for me. I had to copy the asset to somewhere else (in my case Desktop) and point the tool to there.

Next choose Circle as the shape and voila, you have your asset. Not.


So it looks like the tool does not trim the icon to be a circle. It tries to, you can see the shape. I filed a bug for it, but I don't think it has been triaged yet.

In the meantime, you can use Roman Nurik's excellent online Asset Studio to generate your icons.

App Shortcuts

One of the biggest features on this version is app shortcuts (please stop calling it force touch, that's not ours).

The Developer site is quite verbose on how to implement app shortcuts. For an overview on what app shortcuts are and the different types (static and dynamic), head on over to the developer site right now and read the intro.

But in a nutshell, and I'm quoting here:
Android 7.1 allows you to define shortcuts to specific actions in your app. These shortcuts can be displayed in a supported launcher, such as the one provided with Nexus and Pixel devices. Shortcuts let your users quickly start common or recommended tasks within your app.

Static shortcuts

Static shortcuts are simple enough. It is so simple in fact, that I doubted myself.
Basically copy-paste stuff from the dev guide, tweak it to use your own app's Intents and it just works. To try it out, I re-used existing PNG icons from our app. But of course, we want to do it right, right?

So first up is to make the icons follow the design guidelines.
• icons should be 24dp x 24 dp
• should be centred in a circle that's 44dp wide
• circle should be in material grey #F5F5F5
• there should be a 2dp padding all around the circle

I needed to convert the icons to vectors, and I found this SVG to vector converter to work best for my purposes. And by best I mean it doesn't mangle the circle, it doesn't lose any of the holes, and is as close as possible to the SVG input.

As always, I tried to define strings in strings.xml. This works well enough for the shortcut labels, but it strangely does not for the shortcutId attribute. And by "does not work" I mean your shortcuts will not appear at all.


Dynamic Shortcuts

App shortcuts can also be dynamic. For my use case, I wanted to expose a few more shortcuts for users who are logged in.

Again, the Developer site has a very good guide on how to get started with including these shortcuts in your app. I highly recommend reading the ShortcutManager Javadoc, as there are more details there than is available in the guide.

A bunch of people have already written about how to implement shortcuts in your app, but I think what most don't mention is that if you need to build up a backstack for the Activity triggered by your shortcut, the docs recommend to use TaskStackBuilder.

This applies to my use case, which is opening the user's Shortlist. In normal circumstances, users get to their shortlist from our main (search) screen. This means that once they are on their shortlist, pressing the back button will take them back to the main screen. We want to replicate this behaviour when they go through the shortcut, and TaskStackBuilder helps us do just that.

Sure you can just manually write out your own Intents[], but remember to set the correct flags for the first Activity in your stack. It's something that's easy to forget, but if we create our Intents via TaskStackBuilder, it will automatically add the correct flags for us.


Reporting Usage

The docs exhort you to report using shortcuts regardless of how the users get there. The API name may be a bit misleading -- reportShortcutUsed -- but think of it as just adding analytics tracking for the screen. So please report usage of both static and dynamic shortcuts!


What's next?

There is so much more stuff to explore with app shortcuts. What happens when the users restore your app from a backup? What if they pinned a shortcut you removed in a new version? How do you re-arrange shortcuts?

I have yet to explore these, so if you have, what are the other quirkiness you encountered?

In the meantime, watch out for our new updates!


27 October 2016

A Little UX Love Goes A Long Way

Yesterday, my bank pushed a notification asking if I'm going to travel. Yes! I am! I filled up the form they asked me to fill up, and tapped Submit.

And then I got this:

I try again, same error. I try again, the app crashes.

I know some of the devs for this app, so I messaged one of them. As any proper developer does, he asks me "What version are you on?"

I went to the app's settings, and I can't find it there. Hmmm. Opened their navigation drawer. Not there. Where is it?! Apparently, it's nowhere in the app. The dev told me to go to my device's settings, look for the app, and look for the version number.

I thought that was weird. I asked the dev why they don't have it, and he said "I can find you in our crash logs using your user ID. I can find your device, version number, user name. Users do not need the version number."

I have always put in the version number somewhere in all the apps I have worked on ever.  Am I doing it wrong? And so I shouted on Twitter:
A bunch of people replied to me, all with some variation of "Yes". I needed the internet on my side today, thank you for heeding the call, Twitter friends.

I really don't understand why you would not want to put the version number in your app.

It's just one TextView. Use the tiniest, thinnest font you have. You don't even need to think about the code. It's all there, in BuildConfig.

If users care enough about your app to report issues, then that means they are really comfortable using it. Why would you kick them out of their comfort zone just to ask them for this piece of information that should be plastered on the wall? Not all users are as tech savvy as you, 23-year-old developer.

I can just imagine someone calling support:
Customer: The application keeps on stopping.
Support: What version of the app are you on?
Customer: Where do I find that?
Support: Open your device's settings....
Customer: What? How?
Support: What phone are you using?
Customer: I don't know, my children gave this to me.

Remember, going to Settings > Applications may be different for each manufacturer. (I'm looking at you, Samsung). And it may not be as easy as telling someone "Go to device settings".

Having the version number is a good excuse to put in an easter egg. Why pass up this chance?

I guess what I want to make out of this is that something as inconsequential as this for you as a developer may be important to end users, or to other people who help you make your app better. It is bad enough that users encounter bugs so severe they feel like it's worth reporting. And surely we do not want to lose those users because simply by the act of reporting issues, they show us that they care about our product. The least we can do as developers is to make it as easy as possible for them to help us.

06 October 2016

Tools of the Trade: Unabridged

I gave an unabridged version of my last Android Meetup talk at this year's YOW Conference. It has been an honour being part of this awesome conference!

What wonderful timing to announce being a part of the Google Developer Experts program too! Thanks to everyone who stayed behind to watch me babble on and on for an hour!


20 September 2016

Tools of the Trade

Here are the slides to my talk at the Android Meetup tonight.


Thanks for all the great questions!

As promised, here are additional links:

Leak Canary (Square) - Really useful leak detection library
Multidex and Performance (Tim Mellor) - Great overview of everything multidex


17 September 2016

String formatting and Lint

One piece of advice that we keep hearing over and over is to extract strings into resources. There really is no reason for you to hard code strings in code.

I wrote before about easily moving strings between Java and XML, and today I'd like to focus on string formatting. The Android dev guide gives a good overview of the support Android has for passing arguments into a String.format(String, Object...).

Worried about using incorrect syntax? I was! I can never remember which of the % or the $ comes first, or if I'm passing arguments in the correct order. To be clear, the syntax is
%[arg number]$[arg type]


Thankfully, Android Studio has come a long way with pointing us in the right direction when working with strings.

First off, a very useful warning when setting manually concatenated text into a TextView:
 And by "placeholders" they mean the format arguments.

You can mix and match multiple arguments and argument types in one string too!

And in case you removed an argument in the XML file but forgot to edit code, another helpful error for you!

If you change the argument type, Studio will tell you about it too.

If you forget the syntax, fear not for Studio will tell you. (May not be too obvious here but I used the incorrect "$1$s" format.)

Android Studio is really so helpful now, we are running out of excuses to be lazy coders. 😱

06 September 2016

Pidcat <3 Android M

If you use Pidcat, there might be issues running the tool if your device is on M+. The issue has been fixed on master but hasn't been released yet.

The readme says to fix the issue, get the latest off master:
12:46 $ brew unlink pidcat
Unlinking /usr/local/Cellar/pidcat/HEAD... 1 symlinks removed
✔ ~/Android 
12:48 $ brew install --HEAD pidcat
Warning: pidcat-HEAD already installed, it's just not linked
✔ ~/Android 

That didn't quite work, so let's link it:
12:48 $ brew link pidcat
Linking /usr/local/Cellar/pidcat/HEAD... 1 symlinks created
✔ ~/Android 

I tried re-running pidcat, but it's still not displaying anything. Which probably means we really don't have the latest code off the repo. The --force switch has been deprecated, so to force an update we would have to call reinstall instead:

12:49 $ brew reinstall --HEAD pidcat
==> Reinstalling pidcat
==> Cloning https://github.com/JakeWharton/pidcat.git
Cloning into '/Library/Caches/Homebrew/pidcat--git'...
remote: Counting objects: 10, done.
remote: Compressing objects: 100% (8/8), done.
remote: Total 10 (delta 0), reused 7 (delta 0), pack-reused 0
Unpacking objects: 100% (10/10), done.
Checking connectivity... done.
==> Checking out branch master
==> Caveats
Bash completion has been installed to:
  /usr/local/etc/bash_completion.d
==> Summary
🍺  /usr/local/Cellar/pidcat/HEAD: 5 files, 19.5K, built in 4 seconds
✔ ~/Android

Or, if do not want to do all that, you can also do:
$ adb logcat -v brief | pidcat my.package.name


23 August 2016

A big step

Today was the day.

Today was the day a thing I worked on was open sourced. It's done. It's out there. My code. For everyone to see. It is like baring my soul to the world. It is baring my soul to the world.

You can't possibly imagine how I feel. I am frightened. I am elated.

Will people find it useful? Will they use it? Will they look at my code and laugh at how stupid I am? Will they finally know for sure that I am a ruse? Will they whinge about how I am Not Doing Things Right?

And you know what? I don't care. I've done my part and did the best I could.

(I lied. I do care. But I promise I'll try to get over it as soon as I can.)

Be afraid. But still do it.

Massive thanks to the Domain Android team for the support, code reviews, suggestions, feedback, and putting up with my baking frenzies; and to Mike for the code contributions, and for helping me through the very arduous publishing process.

14 August 2016

Winging It: How I Got to be an Android Dev And What I Learned From It

They say all relationships go through a rough patch at two, seven, then ten years. I don't remember who said it, but someone told me that many years ago.

Next week will be my moving-to-Sydney second anniversary, so I figured this is a good time to write this post.


During I/O last May, I met one of the coolest ladies ever, Yasmine. She asked me how I got into Android development, and when I was done telling her she said I should blog about it. So here it is, Yasmine. Better late than never. ;)


In the beginning...


If there's one thing you should know about me, it's that I find it very hard to make decisions. Who's your best friend? What's your favourite food? What should you name your stuffed panda? I don't know the answer to these things. So imagine 16-year-old me, about to graduate high school, and I had Zero Idea what I wanted to major in. The first university I applied to? I wrote down what major I was applying for right in front of the registrar, literally before handing her my application form (Business Economics).

I ended up going to another school, majoring in Electronics and Communications Engineering. I had one computer programming subject in freshman year. And I hated it. I hated it with a passion. I couldn't figure how anything works, and I swore I would never do that again.

My first job after uni was with Intel as a product engineer. I worked there for two years. Lived in the middle of nowhere, worked long hours. But I thought that's par for the course; part of being an adult is working hard, right? And then the semiconductor industry in the Philippines started flipping out. A lot of other factories closed down, some of the products we used to look after were being transferred to other sites. I decided I'd rather look for another job now, than being retrenched and not knowing how long I will be jobless for.


What Now?


I wanted a job back in the city, and I kinda don't want to stay in a sinking industry. But then again, there is nothing else I know how to do. Yeah, I am a licensed engineer, so technically I could work for a telco, or a TV station even! But at that time, if you want to for a telco, you'd have a better chance of getting hired if you interned with them right out of uni. And I didn't, so that's out. There were a lot of job postings for software developers though. But I hated programming! I don't know how to do it!

And this is when my first lucky break came. I am so fortunate that I met a manager who trusted in me. I was upfront with her, I don't know shit. I would have to learn on the job, so it would be a slow start. Needless to say, I learned a lot in that job. I worked on some pretty cool stuff (we made apps installed in SIM cards), and met a lot of really nice people. But more importantly, it kickstarted my foray into software development.

I eventually worked on more enterprise-y stuff (boring). Until the time we ran out of projects. I mean I'm all for coming in puttering around the office doing nothing and getting paid for it. But after two days it turns out it kinda sucks. It was 2009 and I keep on hearing about this new OS from Google called Android and that the SDK is Out Now! and that You Should Try It Out. So I installed all the things and started Android-ing.

Things Get Interesting


So now that I have built a shiny, new Hello World app that runs on an emulator, I took that as a sign that I have the creds to apply for an Android development job. I joined a start up, and again, I was upfront about it -- I don't know how to do this, I have just been playing around, but if you want to pay me to play around, then we can be friends. And so I was met with another lucky break.

It was an encouraging time to be a dev. The Android Dev StackOverflow community was much smaller, we are all learning at the same time, and honestly, I think everyone was kinder and more forgiving+.

I eventually worked for a company whose mobile team is distributed across offices in Manila, Sydney, and New York. I was the first Android developer in the Manila office, but by then I was so used to it that I didn't mind.

It was there that I met the guy who would eventually refer me to Domain, and for that I am forever grateful to him. Domain has done so much for me, both personally and professionally. I work with a really talented team, and I have never seen a company love a product so much. Domain made my dream of attending IO a reality, and through my work with them I got to work on a lot of pretty sweet features that I never dreamed of++. Another lucky break, and I mean to make the most out of it.

And?

I guess what I mean to say is that I have just been winging it all these years. But at least I'm honest about it, right? It there's anything I have learned, it is that there is nothing wrong with saying "I don't know". There are times when we need to pretend to know things, but there are a lot more times when we need to accept that we do not know things.

Do not be afraid to try something new, no matter how scared it makes you feel. Easier said than done, I know. But sometimes it really helps to take a deep breath, close your eyes, and just jump+++.  Lundagin mo, baby!


+ I was looking at my old StackOverflow questions, and I seriously think that if I asked them today, I would have a lot of "What are you, stupid?" comments. Or maybe I'm just old and cynical. I don't know. The point is, we have all been there, so be kind to another, okay?
++ This merits a post all on its own
+++  I distinctly remember that's how I applied to my first Android job. I wrote my cover letter, proof read it, hovered my mouse over the Send button, took a deep breath, then clicked it before I could change my mind.

04 August 2016

Stylish Dynamic Layouts

One of the things we are taught in Android is that we should gracefully handle different layouts based on screen sizes. With more and more things being not just screen size-specific but also OS version-specific, this is one thing I think a lot more devs need to pay attention to. Today was my turn to do just that.

I wanted to create a dialog with an image that resizes itself while maintaining aspect ratio but being constrained by the container. Okay.

So I went about creating my ImageView:
<ImageView
android:id="@+id/permission_image"
android:layout_width="match_parent"
android:layout_height="wrap_content"
android:minHeight="200dp"
android:adjustViewBounds="true"
android:scaleType="centerCrop"
android:src="@{ContextCompat.getDrawable(context, permission.descriptionDrawable)}"/>

Loaded up the layout and it looks satisfactory:

But then, I tried rotating and what the hell!

The image does not fit, you cannot see "NOT NOW". It doesn't work. Then I tried it on a tablet:

OMG how could it possibly get worse. There is so much space and it's not filling it up properly! I am pretty sure the root layout has layout_height="wrap_content". Weird.

After some furious Googling, I found out that I have to set the LayoutParams on the dialog after it has been shown. Why do I have to do that? I said wrap it and you refuse and now you want me to do it myself? Why?

I gave in and did the thing that StackOverflow tells me to. But it didn't work. It still looked the same. I tried moving stuff around; calling setLayout instead of setAttributes. It still looked the same. :sad_panda:

And so the time has come to look for another approach. A couple of things need to happen:
a. We shouldn't make the user scroll just to click the buttons on a landscape phone
b. Make the image take up more space on tablets

To make (a) happen, we either: create a new layout for this orientation or just set the image to be invisible. The second option is more appealing for me. There really is not much difference in the two orientations aside from the image after all. We can set the visibility of the image at runtime, but then maybe we can afford to show the image if there is enough space for it.

This means that to make (b) happen, maybe we need to tweak our layout a little. And this is where the beauty of Android's alternative resources come in. To be as less repetitive as possible, I chose to harness styles too, since I only need to override one attribute -- the visibility.

First I created a style in the default /res/values folder that I would apply to the image:
<style name="DescriptionImage">
   <item name="android:visibility">gone</item>
</style>

Now it's time to make the variations. We want to hide the image if we are in landscape, so into /res/values-land this style goes:
<style name="DescriptionImage">
   <item name="android:visibility">gone</item>
</style>

But we want to show it if there is enough space, so into /res/values-h500dp this style goes:
<style name="DescriptionImage">
   <item name="android:visibility">visible</item>
</style>

And now it's just a matter of applying this style to our image (and I found out that setting maxHeight works a bit better):
<ImageView
android:id="@+id/permission_image"
android:layout_width="match_parent"
android:layout_height="wrap_content"
android:maxHeight="200dp"
android:adjustViewBounds="true"
android:scaleType="centerCrop"
style="@style/DescriptionImage"
android:src="@{ContextCompat.getDrawable(context, permission.descriptionDrawable)}"/>

I applied this technique to another dialog and here's the end result on a phone:


Yay!

19 July 2016

Using resource IDs in data binding layouts

I have been playing with data binding more and more over the last couple of weeks. This week, it's all about creating a dialog with stuff dictated by a value from an enum.

Each value in this enum has the following properties:
@IdRes int textView
@StringRes int quote
@StringRes int name
@ColorRes int colour

I have added a new button in my Sandbox app to choose one value from the enum and display the properties in an alert dialog via data binding. Ambitious, I know!

The relevant Java part is mainly just creating and showing the dialog:
@OnClick(R.id.data_binding_alert)
public void onSendDataBoundAlert() {
   AlertDialog.Builder builder = new AlertDialog.Builder(MainActivity.this, R.style.MaterialAlertDialog);
   builder.setPositiveButton(android.R.string.ok, null)
           .setNegativeButton("Not now", null);
   View view = LayoutInflater.from(MainActivity.this).inflate(R.layout.dialog_data_binding_demo, null);
   DialogDataBindingDemoBinding binding = DataBindingUtil.bind(view);
   binding.setCharacter(getRandomCharacter());
   builder.setView(view);

   builder.create().show();
}

The tricky part is telling data binding how to use our resource IDs. Say I want the colour to be set as a background for a TextView, and the name to be displayed:
<TextView
     android:id="@+id/name"
     android:layout_width="match_parent"
     android:layout_height="wrap_content"
     android:minHeight="64dp"
     android:textSize="24sp"
     android:textStyle="bold"
     android:gravity="center_vertical"
     android:paddingLeft="16dp"
     android:background="@{character.colour}"
     android:text="@{character.name}"/>

Running the sample though, you'll see that the colour is not set and a dark grey-ish lilac-ish colour is used instead:


Unacceptable indeed!

So how do we make the Earl of Lemongrab happy? There are two ways of solving this problem.

A. Use a BindingAdapter

A BindingAdapter lets you manipulate and do a bit more involved logic on your data before applying it to the View. To use a BindingAdapter, first create a static method in your code that is bound to either a standard Android attribute or a custom one.

I create a custom attribute here called characterBackground:
@BindingAdapter({"characterBackground"})
public static void characterBackground(TextView textView, AdventureTimeCharacters character) {
     textView.setBackgroundColor(ContextCompat.getColor(textView.getContext(), character.getColour()));
}

You can then use this BindingAdapter in the TextView:
app:characterBackground="@{character}"
Do not forget to add the app namespace! Android Studio can add this for you. Just type in appNs and it will autocomplete.

This solution works, but is a bit too involved. And you said data binding is easy!!!

Well it kinda is, because, it turns out that we can:
B. Set the value in XML

But it didn't work! Well it turns out the problem is because we are passing a resource ID into an attribute that expects a resolved color value. So the only thing we need to do is to move all that code in our BindingAdapter into XML.

First add the import:
<data>
    . . .
    <import type="android.support.v4.content.ContextCompat" />
</data>

And then use it:
<TextView
     android:id="@+id/name"
     android:layout_width="match_parent"
     android:layout_height="wrap_content"
     android:minHeight="64dp"
     android:textSize="24sp"
     android:textStyle="bold"
     android:gravity="center_vertical"
     android:paddingLeft="16dp"
     android:background="@{ContextCompat.getColor(context, character.colour)}"
     android:text="@{character.name}"/> 

Very convenient! And it works! Note that you do not have to import anything to use context, there is some data binding magic going on that automatically injects it for you if you call it. Think of it as The Beckoning of the Context.


The Earl is now happy.

PS: If you need to set a drawable from a resource ID as an ImageView src, I found that you would also need to do this trick, aka:
android:src="@{ContextCompat.getDrawable(context, character.icon)}"


15 July 2016

Quick tip: Enabling data binding

Say you have a simple layout file:
<LinearLayout xmlns:android="http://schemas.android.com/apk/res/android"
                  android:layout_width="match_parent"
                  android:layout_height="match_parent"
                  android:orientation="vertical">

        <TextView
            android:id="@+id/title"
            android:layout_width="match_parent"
            android:layout_height="wrap_content" />

        <TextView
            android:id="@+id/description"
            android:layout_width="match_parent"
            android:layout_height="wrap_content" />

</LinearLayout>
And say you want to finally give data binding a try. So you watch Yigit's I/O talk on data binding and follow the steps on implementation.

You enable it in Gradle:
android {
    dataBinding {
        enabled = true
    }
}

You wrap your existing layout in <layout> tags.
<layout>
      <LinearLayout xmlns:android="http://schemas.android.com/apk/res/android"
                  android:layout_width="match_parent"
                  android:layout_height="match_parent"
                  android:orientation="vertical">

        ...

      </LinearLayout>
<layout>

Then life started sucking. Your app won't compile. Well, we can fix it in two easy steps!

Step 1: Add namespace declaration to your root tag:
<layout xmlns:android="http://schemas.android.com/apk/res/android">

This still won't compile! If you look at the logs you will see somewhere there: "Error:(7) Error parsing XML: duplicate attribute"

Step 2: Remove xmlns declaration in the now-non-root layout.

And that's it. Add your variables and happy data binding!


Here's a complete layout file for your perusal:
<layout xmlns:android="http://schemas.android.com/apk/res/android">
      <data>
        <variable
            name="listing"
            type="com.zdominguez.blog.samples.Listing"/>
    </data>

      <LinearLayout 
                  android:layout_width="match_parent"
                  android:layout_height="match_parent"
                  android:orientation="vertical">

        <TextView
            android:id="@+id/title"
            android:layout_width="match_parent"
            android:layout_height="wrap_content"
            android:text="@{listing.address}" />

        <TextView
            android:id="@+id/description"
            android:layout_width="match_parent"
            android:layout_height="wrap_content" 
            android:text="@{listing.agency}" />

      </LinearLayout>
<layout>


22 June 2016

Snazzy git blaming

Sometimes, you can't help it. You need to look at what happened in the past to understand what is happening in the present (wow).

If you know the specific line you are interested in, showing history for selection is the way to go.

However, if you want to look at how the file has changed over time, showing annotations (the nice way of saying git blame) might help you. To enable it, right click the gutter then choose Annotations.

From here, you have a ton of options on how you want to display the summary in the Annotations gutter. It's always fun to see which line has been there since the beginning of time.


** Source code is Roman Nurik's Muzei that we forked for an Innovation Day project last year.

The most recent version of the file is marked with an asterisk, like so:

Hovering over an annotation will show the full commit information, including the commit message.


 And clicking on it will open a list of the paths affected by this particular revision.

Look at all those options at the top of the dialog! Have a play and enjoy diff-ing!


19 June 2016

In which I was in a podcast

It has been a month since IO and in case you missed it, I got to chat with Kaushik of Fragmented. And by golly, I made it into an episode! At that point I was about to lose my voice, so I sound really husky. :p

There are some big names in the episode I am in (I still have no idea why I'm there, but I'll take it!), so please give it a listen!

PS: I travelled quite a bit after IO, but I did start a draft of my recap. I hope it sees the light of day eventually!

11 June 2016

More Watches Love and a note on Context

I have previously written about debugging and how Watches can help make inspecting things in your code easier. Today, I would like to reiterate how powerful Watches can be.

When something fails in my code and I'm lucky, I would have a vague idea of what may be causing it. So I launch my app then attach the debugger (NO! to the green bug!); I am stopped at a breakpoint and while staring at the offending line, a "Wait, what if it's this other thing that's causing it?" pops into my head.

If you are used to debugging by peppering your code with Logs or Timbers or Toasts (and there's nothing wrong with that!!), you would have to stop debugging, add the logs, and re-launch your app (thank God for Instant Run!).

However, we can leverage Watches to make this process a whole lot easier. While stopped at a breakpoint, just add a new Watch (⌘+N or click the + in the Watches pane) and start typing.

Let's say for some reason I wanted to see what Intent extras, if any, had been passed into the current Activity. I just add a new Watch and put in the usual way of getting an Activity's extras -- getIntent().getExtras() and now I can inspect what I have been given when this Activity was launched. Easy peasy.


Now in the IntelliJ documentation, there is a quote that says:
Watch expressions are always evaluated in the context of a stack frame that is currently inspected in the Frames pane.
Similar to the way "context" is defined in the real world (and in the Android world too, I guess) this means that Watches will only make sense if they are in used in the correct circumstance where it can be fully understood. Still confused?

Say I am now stopped at a breakpoint in a Fragment (The Frames pane says I am in the method getRandomSublist() in CheeseListFragment.java) and I would like to see the extras passed into this Fragment's host Activity. The previously added Watch will not work since in our current context -- that of a Fragment -- there is no such method getIntent(). To do what I want, I would need to call the Activity first -- getActivity().getIntent().getExtras() (= null, there are no extras received!).


Pretty coooooool. I think in a sense, you can think of Watches as coding without actually coding. Happy debugging!


25 February 2016

Taking a closer look while debugging

One of the most common sources of bugs (at least of my bugs) is math. I have been working on dynamically resizing a View the past days, and it was driving me nuts! I needed to consider preserving aspect ratio, device density, original view size, etc etc. Math is hard guys!

Thankfully, Android Studio has a bunch of tools that can help us make debugging stuff like this a little less painful.

The debug tool window is your friend


The debug tool widnow shows you a TON of helpful information when stopped at a particular breakpoint. On the left, you can see all the calls that were done until you arrive at a particular breakpoint. Clicking on one of those will open the corresponding file and show you the exact line. A gif paints a thousand words so here you go:


The second pane shows you all variables in the currently selected file. This means that if you step through the method calls as described above, the displayed variables will change depending on that file. If you want to further inspect properties of a variable, you can expand that and do a deeper dive (this for instance, will show all inherited fields as well).

More inspection options

One thing I love about Android Studio is that it shows you inline some pretty useful information about a variable.

Here I can see that view is a LinearLayout, among other things. If you want to further inspect the properties of this view, you can either (1) go through the variable pane as described above, or (2) look at the params directly from that line of code.

I find Option 2 more appealing since I have more context on what I was trying to do with this variable, and if I did anything to it before or after a specific line of code. Here's option 2 in action:
Hover over the variable of interest then click on the + all the way to the left (Or +F1) then inspect to your heart's content.

Doing things with what we inspected

Now that we know what properties the variable we are interested in has, it's time to actually look at what we are doing with those properties. Say you are trying to arrive at a value that will depend on the height of this view. You do some basic math:
view.getHeight() / 2

You can ask Android Studio to tell you what that resolves into by asking it to evaluate the expression. Highlight interesting expression, right click, choose Evaluate Expression (alternative: highlight expression then +F8). Studio will then show you a pop up with the selected expression; you can edit the expression here as you wish. Once ready, click Evaluate and you can now see what the result would have been if this expression was actually ran.


Most of the time, however, we are not interested in computing values on the fly. We know what variable we are interested in, we know if there's any property of that variable we wanted to look at, and we know that we are doing some (possibly weird) math. This is when Watches become extremely useful. If you paid close attention to the Evaluate Expression gif, you would have noticed that there's a tiny footnote below the expression text: Use Control+Shift+Enter to add to Watches.

Watches

Watches is that unassuming pane all the way to the right of the debug tool window in the very first screenshot. Here you can add any number of variables and expressions and the Watches pane will resolve them all for you in the context of the current frame (Patience grasshopper, you will soon know what this means).

One way to add watches is to evaluate an expression and use the shortcut as hinted above. Another way is to highlight the expression then choose Add to Watches from the context menu. Once added you can see the expression and the evaluated value immediately in the Watches pane.

You can also manually add a Watched value by clicking on the + in the Watches pane itself. The cool thing about doing it manually? Autocomplete!!

The amazing thing and most useful thing about Watches is that the values are updated as you step through the code AND are retained across debugging sessions.
Once I step through the code (F8), the expressions in Watches are updated within the current frame's context. Notice how initially changeBounds is undefined? Step over until we hit the assignment and the value we are watching is updated.

TL;DR?

My favourite reasons for loving Watches:

  • I do not have to Timber or Toast or Log all the expressions I am interested in
  • Evaluated expressions, but lots of them
  • No need to re-add when looking at particularly nasty bugs
  • Quick and easy way to view results by changing expressions on the fly

There are a LOT more ways of maximising your mileage with Watches, so head on over to the IntelliJ blog to read all about them!

PS: Clicking on the images/gifs to embiggen should work (I hope)!

22 February 2016

LinearLayouts, TextViews and Drawables

I sent out a series of tweets today about LinearLayouts and unexpectedly, quite a few people like them. I decided to get off my lazy ass and actually write it down in a post for easy reference.

Let's start with the LinearLayout root view.  One of the most common things designers ask us to do is to put dividers in. Quick! Think! What should we do? Add a generic View for each divider? How about NO? Instead, we can delegate the task of displaying these dividers to the LinearLayout itself:
<?xml version="1.0" encoding="utf-8"?>
<LinearLayout xmlns:android="http://schemas.android.com/apk/res/android"
              android:layout_width="match_parent"
              android:orientation="vertical"
              android:layout_height="match_parent"
              android:divider="@drawable/divider_horizontal_dark"
              android:showDividers="middle">

Where divider_horizontal_dark can be anything you want to be the divider (I recommend using a shape):

<?xml version="1.0" encoding="utf-8"?>
<shape xmlns:android="http://schemas.android.com/apk/res/android"
       android:shape="rectangle" >
    <solid android:color="#24000000" />
    <size android:height="1dp" />
</shape>

Doing this prevents us from littering our view hierarchy with useless empty views. LinearLayout is actually extremely powerful, and a lot of the stuff most apps usually need is already built in. PS: For some reason I cannot find the showDividers attribute in the Android docs, but the available attributes are middle, beginning, endnone (or a combination of those). EDIT+Nick Butcher showed us the light: docs here!

EDIT AGAIN: Nick has also lovingly pointed out that setShowDividers() was added in API 11. If by some cruel twist of fate you need to support anything below that, use LinearLayoutCompat. Also, you poor, poor thing.

Another common thing that we are asked to do is to have an image +  text displayed side by side. We use this quite a bit in the Domain app, most notably in the main navigation drawer:

Instead of having one huge RelativeLayout or (horror!) nested LinearLayouts, we can just have a bunch of TextViews in one LinearLayout.

You see, TextViews have this magical ability to add Drawables to themselves. You can position the Drawable anywhere you want, and even tint it from XML! :gasp:

Drawable placement can be in any of the cardinal directions (bottom, top, left, right) and the tint should be a defined colour in XML (not actually required, but encouraged. By me. I encourage it.). If the Drawable is too close to the text for your or your designer's taste, you can adjust the distance via the drawablePadding attribute.

So here's a screen of four TextViews in one LinearLayout:


And the full code (also in github):
<LinearLayout xmlns:android="http://schemas.android.com/apk/res/android"
              android:layout_width="match_parent"
              android:orientation="vertical"
              android:layout_height="match_parent"
              android:divider="@drawable/divider_horizontal_dark"
              android:showDividers="middle">

    <TextView
        android:id="@+id/text1"
        android:drawableTop="@drawable/ic_notifications_black_24dp"
        android:drawableTint="@color/lemongrab"
        android:drawablePadding="8dp"
        android:layout_width="match_parent"
        android:layout_height="wrap_content"
        android:textSize="20sp"
        android:padding="16dp"
        android:text="Text 1"/>

    <TextView
        android:id="@+id/text2"
        android:textSize="20sp"
        android:drawableRight="@drawable/ic_notifications_black_24dp"
        android:drawablePadding="8dp"
        android:padding="16dp"
        android:layout_width="match_parent"
        android:layout_height="wrap_content"
        android:text="Text 2"/>

    <TextView
        android:id="@+id/text3"
        android:layout_width="match_parent"
        android:layout_height="wrap_content"
        android:drawableLeft="@drawable/ic_notifications_black_24dp"
        android:drawablePadding="8dp"
        android:padding="16dp"
        android:text="Text 3"
        android:textSize="20sp"/>


    <TextView
        android:id="@+id/text4"
        android:layout_width="match_parent"
        android:layout_height="wrap_content"
        android:drawableLeft="@drawable/ic_notifications_black_24dp"
        android:drawablePadding="8dp"
        android:padding="16dp"
        android:text="Text 4"
        android:textSize="20sp" />


</LinearLayout>

If you need to update the Drawable tint at runtime (if you are basing it on some status field, for example), you can do so via code:

// left, top, right, and bottom
DrawableCompat.setTint(mText3.getCompoundDrawables()[0].mutate(), ContextCompat.getColor(this, R.color.red));

Note that we need to call mutate() or else the tint will be everywhere and it's gonna be a mess!

So there you have it! Remember kids, #perfmatters!

05 February 2016

Squashing Bugs

This has been one hell of a busy week for me. I think you can sort of tell from my Tweets and G+ posts that I have been debugging A LOT.

I was helping the new guy on our team look at something, and I think I almost gave him a heart attack.
It takes FOREVER to launch the app when you click that green bug. I hate that green bug. Save yourself some heartache:
  1. Put in your breakpoints
  2. Launch the app as you normally would
  3. Navigate to the offending activity
  4. Attach Debugger to Android Process

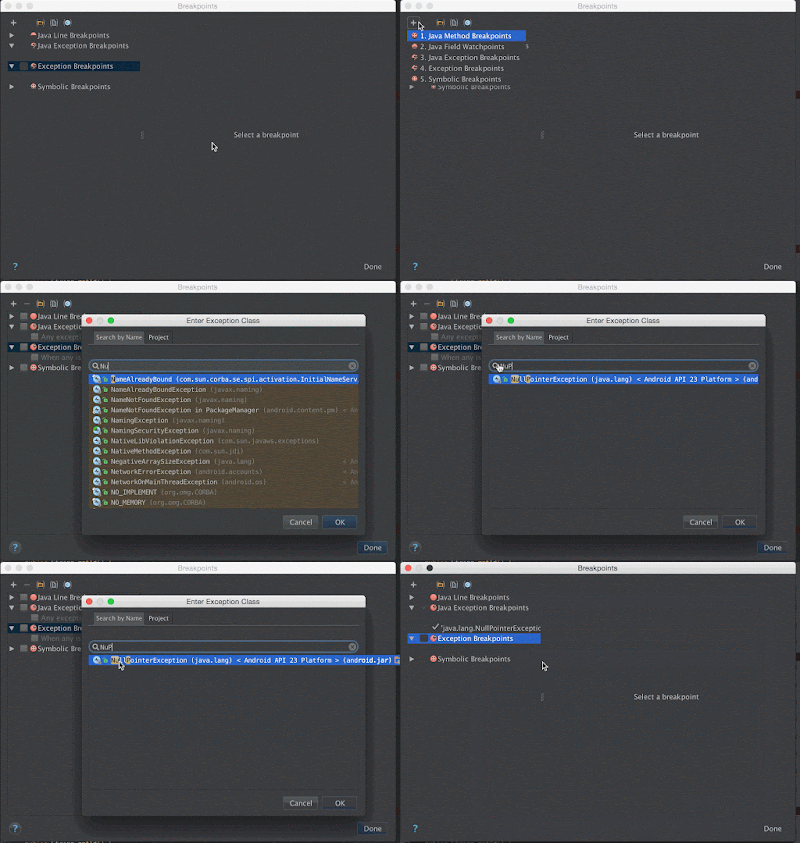
App encountering what looks like random crashing? Put in some exceptionally useful Exception Breakpoints! In the Breakpoints dialog (⌘+⇧+F8 / CMD+SHIFT+F8), click on the +, choose Java Exception Breakpoints and add the exception you are interested in.

This means that even without actual breakpoints -- as long as the debugger is attached to the process -- Android Studio will suspend the process on the exact line that will throw the exception. Very easy way of narrowing down on the root cause!

But what if (God forbid!) you uncover another issue while debugging? Now you have a ton of breakpoints but you don't want to remove them because what if you still haven't fixed that other thing and this line is really important but you don't want to stop all the time. Ugh. It's a mess!

Make some semblance of order out of the chaos. Group your breakpoints. A breakpoint group can contain any number of any kind of breakpoint that Android Studio supports. This allows you to mute/unmute a set of breakpoints without having to hunt them down one by one.

Just choose the interesting breakpoints, right click, then choose Move to group. From here you can either create a new group or add them to an existing group. You can configure each breakpoint to behave how you want them to: suspend the thread, log a message, hit and forget, etc.

Here's the whole thing, in one magnificent gif.


Again, apologies to +Nick Butcher. I owe you a beer next time you're in Sydney, Nick.