I gave an unabridged version of my last Android Meetup talk at this year's YOW Conference. It has been an honour being part of this awesome conference!
What wonderful timing to announce being a part of the Google Developer Experts program too! Thanks to everyone who stayed behind to watch me babble on and on for an hour!
Showing posts with label android studio. Show all posts
Showing posts with label android studio. Show all posts
06 October 2016
22 June 2016
Snazzy git blaming
Sometimes, you can't help it. You need to look at what happened in the past to understand what is happening in the present (wow).
If you know the specific line you are interested in, showing history for selection is the way to go.
However, if you want to look at how the file has changed over time, showing annotations (the nice way of saying git blame) might help you. To enable it, right click the gutter then choose Annotations.
From here, you have a ton of options on how you want to display the summary in the Annotations gutter. It's always fun to see which line has been there since the beginning of time.

** Source code is Roman Nurik's Muzei that we forked for an Innovation Day project last year.
The most recent version of the file is marked with an asterisk, like so:

Hovering over an annotation will show the full commit information, including the commit message.

And clicking on it will open a list of the paths affected by this particular revision.

Look at all those options at the top of the dialog! Have a play and enjoy diff-ing!
If you know the specific line you are interested in, showing history for selection is the way to go.
Change can be confusing. Filter history to actual piece of code you're interested in. #AndroidDev pic.twitter.com/nd27tgv20f— Zarah Dominguez (@zarahjutz) July 28, 2015
However, if you want to look at how the file has changed over time, showing annotations (the nice way of saying git blame) might help you. To enable it, right click the gutter then choose Annotations.
From here, you have a ton of options on how you want to display the summary in the Annotations gutter. It's always fun to see which line has been there since the beginning of time.

** Source code is Roman Nurik's Muzei that we forked for an Innovation Day project last year.
The most recent version of the file is marked with an asterisk, like so:

Hovering over an annotation will show the full commit information, including the commit message.

And clicking on it will open a list of the paths affected by this particular revision.

Look at all those options at the top of the dialog! Have a play and enjoy diff-ing!

05 February 2016
Squashing Bugs
This has been one hell of a busy week for me. I think you can sort of tell from my Tweets and G+ posts that I have been debugging A LOT.
I was helping the new guy on our team look at something, and I think I almost gave him a heart attack.
App encountering what looks like random crashing? Put in some exceptionally useful Exception Breakpoints! In the Breakpoints dialog (⌘+⇧+F8 / CMD+SHIFT+F8), click on the +, choose Java Exception Breakpoints and add the exception you are interested in.
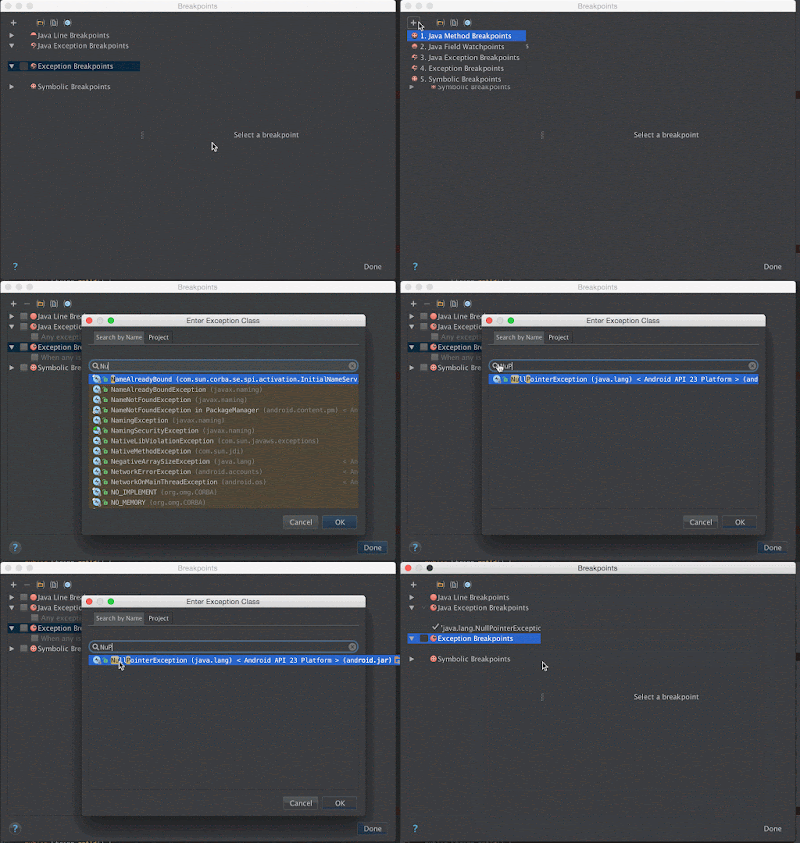
This means that even without actual breakpoints -- as long as the debugger is attached to the process -- Android Studio will suspend the process on the exact line that will throw the exception. Very easy way of narrowing down on the root cause!
But what if (God forbid!) you uncover another issue while debugging? Now you have a ton of breakpoints but you don't want to remove them because what if you still haven't fixed that other thing and this line is really important but you don't want to stop all the time. Ugh. It's a mess!
Make some semblance of order out of the chaos. Group your breakpoints. A breakpoint group can contain any number of any kind of breakpoint that Android Studio supports. This allows you to mute/unmute a set of breakpoints without having to hunt them down one by one.
Just choose the interesting breakpoints, right click, then choose Move to group. From here you can either create a new group or add them to an existing group. You can configure each breakpoint to behave how you want them to: suspend the thread, log a message, hit and forget, etc.
Here's the whole thing, in one magnificent gif.

Again, apologies to +Nick Butcher. I owe you a beer next time you're in Sydney, Nick.
I was helping the new guy on our team look at something, and I think I almost gave him a heart attack.
It takes FOREVER to launch the app when you click that green bug. I hate that green bug. Save yourself some heartache:Scared new guy when I yelled "NOOO!" as he was about to click green bug. Run then attach when debugging. #AndroidDev pic.twitter.com/cFUNKDu0f1— Zarah Dominguez (@zarahjutz) February 5, 2016
- Put in your breakpoints
- Launch the app as you normally would
- Navigate to the offending activity
- Attach Debugger to Android Process
App encountering what looks like random crashing? Put in some exceptionally useful Exception Breakpoints! In the Breakpoints dialog (⌘+⇧+F8 / CMD+SHIFT+F8), click on the +, choose Java Exception Breakpoints and add the exception you are interested in.
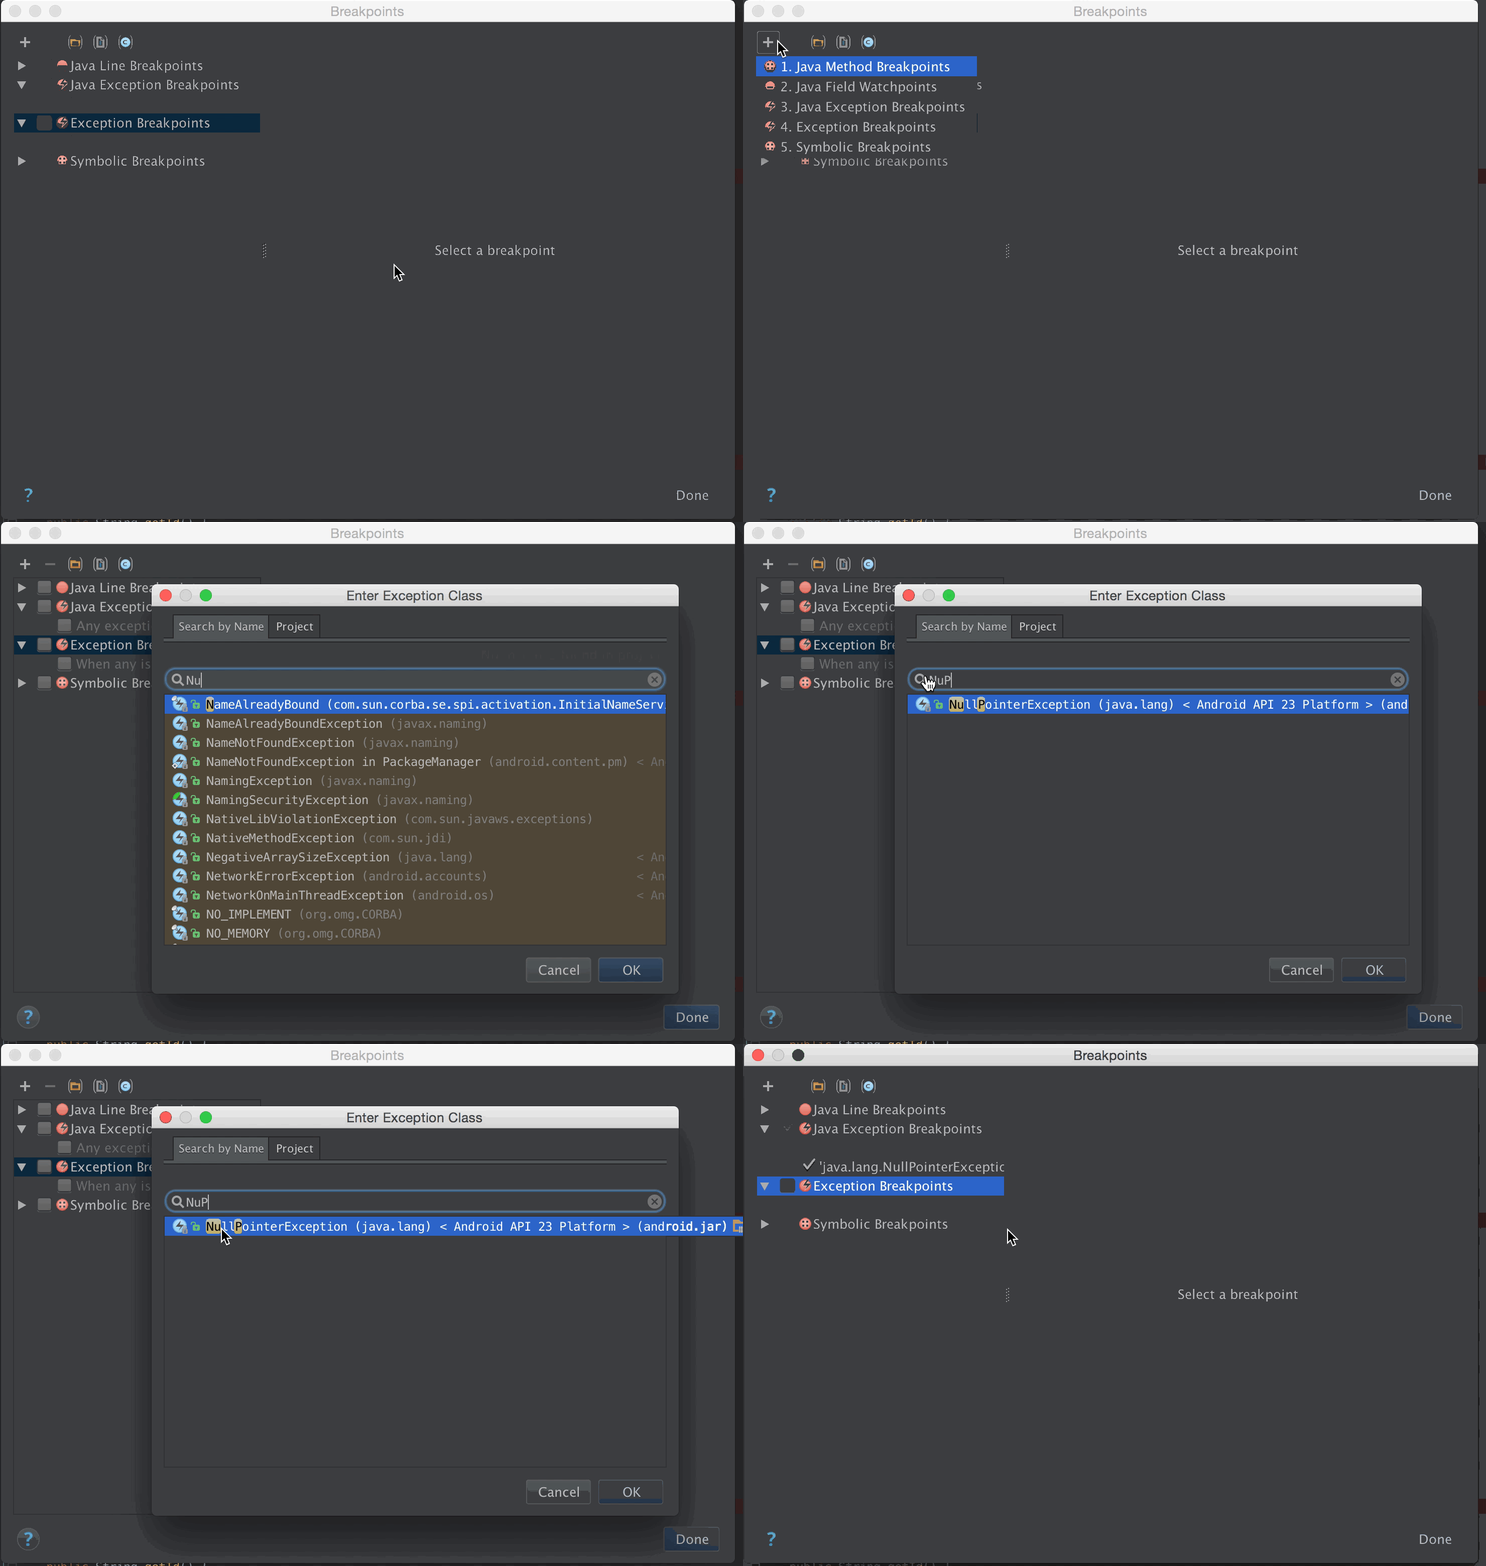
This means that even without actual breakpoints -- as long as the debugger is attached to the process -- Android Studio will suspend the process on the exact line that will throw the exception. Very easy way of narrowing down on the root cause!
But what if (God forbid!) you uncover another issue while debugging? Now you have a ton of breakpoints but you don't want to remove them because what if you still haven't fixed that other thing and this line is really important but you don't want to stop all the time. Ugh. It's a mess!
Make some semblance of order out of the chaos. Group your breakpoints. A breakpoint group can contain any number of any kind of breakpoint that Android Studio supports. This allows you to mute/unmute a set of breakpoints without having to hunt them down one by one.
Just choose the interesting breakpoints, right click, then choose Move to group. From here you can either create a new group or add them to an existing group. You can configure each breakpoint to behave how you want them to: suspend the thread, log a message, hit and forget, etc.
Here's the whole thing, in one magnificent gif.

Again, apologies to +Nick Butcher. I owe you a beer next time you're in Sydney, Nick.
10 September 2015
Raising Activities From the Dead
One of the scenarios I admittedly almost always forget to test is "What happens when my app goes into the background, then the OS kills is to claim memory, then I try to resume?" Usually it's "Well, I handle onSavedInstanceState not being null, so I am great!" It is fine and dandy for simple apps; but once your Activity or Fragment gets beefier and you start relying on state for more and more things, it can get complicated pretty quickly (In my case, the Fragment has setRetainInstance(true)).
This scenario in particular is kind of hard to reproduce willingly. I usually see this when I leave an app running, make my phone do some heavy work overnight, then resume the app the next day.


3. Push your app to the background. Pressing the HOME button should be sufficient. This will call onSaveInstanceState, which is all that matters really. It is after all what we want to test.
4. Back in Studio, press the magical tiny red button pointed to in the previous image. Notice that Studio now appends [DEAD] to your app's process. It is now gone. He's dead, Jim!

5. Resume your app. I usually just do this via recent apps.

6. If you look at Studio, you'll see that your app is now no longer dead, but has a new process ID, in this case 26742.

This scenario in particular is kind of hard to reproduce willingly. I usually see this when I leave an app running, make my phone do some heavy work overnight, then resume the app the next day.

So what you gonna do?
It turns out that Android Studio has the answer! There is this magical tiny red button that allows you to simulate this exact scenario.
1. Open your app to the Activity you want to test (I use a very simple app here just for demo).

2. In Studio, go to Android Monitor (make sure that your app is selected). Note the process ID, in this case it is 25647.

3. Push your app to the background. Pressing the HOME button should be sufficient. This will call onSaveInstanceState, which is all that matters really. It is after all what we want to test.
4. Back in Studio, press the magical tiny red button pointed to in the previous image. Notice that Studio now appends [DEAD] to your app's process. It is now gone. He's dead, Jim!

5. Resume your app. I usually just do this via recent apps.

6. If you look at Studio, you'll see that your app is now no longer dead, but has a new process ID, in this case 26742.

If at this point you step through your code, you will notice that your Activity will go through the whole (re-)creation process with the Bundle given the values you have saved in onSaveInstanceState. No more waiting overnight, yay!
12 August 2015
Lies I've been told today
So I played around with data binding today. And these are the lies that the dev guide told me (explicitly or inferred):
- There is a method DataBindingUtil.bindTo(viewRoot, layoutId)
- That this will work MyLayoutBinding.bind(viewRoot);
- Android Studio has auto-complete
13 July 2015
Pasting and Extracting Stuff
A lot of times, but especially when I am implementing some new logic, coding for me takes several steps:
1. Write down what I have to do as comments
2. Implement what I have written down
3. Refactor and improve what I have implemented
More often than not, step 3 means moving stuff around, copy-pasting things, extracting variables, defining constants, etc. I am not a hardcode never-using-my-mouse developer. If anything, I think my brain is limited to holding a limited number of shortcuts for everything I use in my life. Android Studio has the perfect shortcuts for making this easier for me. Luckily, these shortcuts made it to the list of things my brain remembers.
How many times have I copied (or even cut!) text but instead of pasting, I press ⌘+V (CMD+V) again! ARGH. I used to do ⌘+Z (CMD+Z) any number of times until I get back what I wanted. That is, until I learned about ⌘+⇧+V (CMD+SHIFT+V)! This key combo shows the clipboard history, which means no more fretting. Yay!
Refactoring also mostly involves extracting variables. I have already shown how to extract strings into strings.xml, and here I show how to extract things into methods, variables, fields, or constants.
It is fairly easy to remember them. Just combine ⌘+⌥ (CMD+OPTION) with the first letter of what you want to extract to. Time for a handy table!
This video might do a better job of showing what I'm trying to say. Code from Chris Banes's Cheesesquare demo.
1. Write down what I have to do as comments
2. Implement what I have written down
3. Refactor and improve what I have implemented
More often than not, step 3 means moving stuff around, copy-pasting things, extracting variables, defining constants, etc. I am not a hardcode never-using-my-mouse developer. If anything, I think my brain is limited to holding a limited number of shortcuts for everything I use in my life. Android Studio has the perfect shortcuts for making this easier for me. Luckily, these shortcuts made it to the list of things my brain remembers.
How many times have I copied (or even cut!) text but instead of pasting, I press ⌘+V (CMD+V) again! ARGH. I used to do ⌘+Z (CMD+Z) any number of times until I get back what I wanted. That is, until I learned about ⌘+⇧+V (CMD+SHIFT+V)! This key combo shows the clipboard history, which means no more fretting. Yay!
Refactoring also mostly involves extracting variables. I have already shown how to extract strings into strings.xml, and here I show how to extract things into methods, variables, fields, or constants.
It is fairly easy to remember them. Just combine ⌘+⌥ (CMD+OPTION) with the first letter of what you want to extract to. Time for a handy table!
| Shortcut | |
|---|---|
| ⌘+⌥+M | Method |
| ⌘+⌥+V | Variable |
| ⌘+⌥+F | Field |
| ⌘+⌥+C | Constant |
This video might do a better job of showing what I'm trying to say. Code from Chris Banes's Cheesesquare demo.
08 July 2015
Super lightning talk: Tinkering with Tools
If you are just starting Android development or migrating from Eclipse to Android Studio, I gave a lightning talk on setting up some tools:
14 May 2015
Stringy strings
While we are on the subject of strings, here are more ways of dealing with them in Android Studio. We all know that we should not hardcode strings in code, right? But sometimes, we forget and tend to do code first before defining them in strings.xml.
There are a couple of ways that Android Studio/IntelliJ makes this easy for us. The gif below (which took me a while to figure out how to do, by the way), shows how to deal with:
1. Moving a hardcoded string into strings.xml
2. Giving a previously undefined string ID a value in strings.xml
 |
| (Click to embiggen) |
Move hardcoded string into XML:
This is probably the more common scenario. You happily put in texts into your TextViews, and now you have to copy and paste them into strings.xml. Don't! There is a shortcut for that.
Put your cursor somewhere in the string, press ALT+Enter to bring up the context menu, choose "Extract string resource" and give your string resource a name. This will create a new <string name="my_string_name">My string value</string> in strings.xml.
Studio magically also calls getString(R.string.xxxxx) for you. Neat, huh?
Make new string from ID:
This is for when you suddenly remember that you need a new string and want to sort of try to do it correctly so you type in the string ID. Only it hasn't been defined yet, so Studio complains. But it's fine. There is a shortcut for that.
Put your cursor somewhere in the as of yet undefined ID, press ALT+Enter to bring up the context menu, choose "Create string value for resource my_string_id", and type in the actual string value you want. Again, this will create a new <string name="my_string_id">My other string value</string> in strings.xml.
Remember, in both of these cases, Studio will create the new strings in strings.xml, but you can modify it to put in whatever variant you want it to be in (for localisations, screen size support, etc).
Subscribe to:
Posts (Atom)